Change Computer Sid Windows 2008 R2
- This blog contains Matt's ramblings about Business Productivity and Information/Knowledge Worker solutions, Cloud, Social Media and other technology stuff.
- If you installed an English version of Windows Server, then you can add additional display languages. First, download the language pack from Microsoft. You can find.
This article will discuss what a SID is. Then, it continues to discuss why some SIDs are well-known, and the concept and technology of SIDs.
Bare- metal, system state recovery in Windows Server 2. R2. Solutions provider takeaway: In this chapter excerpt, you will get the steps required to perform both a bare- metal recovery and system state recovery in Windows Server 2. R2. There is also information on recovering system state data containing Active Directory data and how to use Windows system recovery tools. By submitting your personal information, you agree that Tech. Target and its partners may contact you regarding relevant content, products and special offers. You also agree that your personal information may be transferred and processed in the United States, and that you have read and agree to the Terms of Use and the Privacy Policy. Recover Your Data.
I hope recovering your data is not a daily task. However, you should know how to recover data just in case. Fortunately, the recovery tool is straightforward to use presuming you have performed a proper backup. The method used to back up your data will always determine what recovery method you will need to perform. Your desired outcome will impact what and how you need to perform your recovery. Restore Specific Files or a Full Volume.
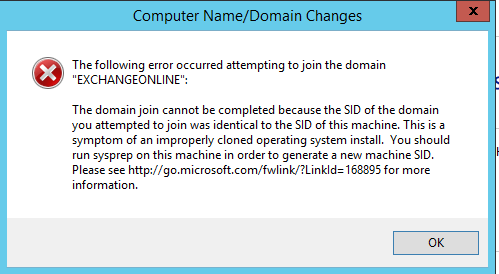
I was going sysprep a base image of Windows Server 2008 this morning and followed my own instructions on sysprepping Windows. I went to the installation DVD and. Also is there any difference in finding the SID on a member server vs.
If the time comes that you need to recover the files, it is just a matter of knowing what files and what time frame you need to restore. Start Windows Server Backup by selecting Start . If the backup is stored locally on an internal hard drive, verify This Server is selected, click Next, and proceed to step 7. If the backup is stored elsewhere, select A Backup Stored On Another Location, and click Next. Depending on the location of the backup, click Local Drives or Remote Shared Folder, and click Next. If you specified Remote Shared Folder, you will need to type in the UNC name for the backup in the form of \\servername\sharename. On the Select Backup Location screen, verify your backup set, and click Next.
Select the server data you want to recover, and click Next. On the Select Backup Date screen, select the date and possible time for the backup set you want to recover from, and click Next.
On the Select Recovery Type page, select what you want to recover. When you select this option and click Next, you will see a screen similar to Figure 8. Select Volumes if you need to recover the entire volume from a backup set. When you select this option and click Next, you will be provided with a list of volumes to select from.
Select System State if you want to recover system state. Figure 8. 1. 5: Recovering a specific file. Note: You may also notice a choice called Applications. Depending what applications you have installed on your server, some may have registered with Windows Server Backup. If they have, you have the ability to recover those applications as well. After you make your selection for the recovery of files, click Next.
The Specify Recovery Options screen will look like Figure 8. This screen gives you a few options on how you want to recover the file.
You can recover to the original location or an alternative location. You can also control whether you create a copy of the file to make sure you have both versions, overwrite any existing version of the file, or do not recover the file if one already exists. You can also bring back any security permissions on the file. After you make your selection, click Next. Review the Confirmation screen, and click Recover. After the recovery process is complete, review the results, and click Close.
Figure 8. 1. 6: Recovery options. Perform a System State Restore. When you want to recover system state data, you need to take an extra bit of precaution and planning when recovering this data.
Because of the nature of the data being recovered, you have the potential to render your system unbootable. Specifically, when this restore process is started, it cannot be stopped or interrupted. If it is, this process could render your server unbootable. In other words, use caution when recovering the system state. Of course, if you are using this process, chances are you are not too far from having to rebuild your server anyway. Start Windows Server Backup by selecting Start .
If the backup is stored locally on an internal hard drive, verify that This Server is selected, click Next, and proceed to step 7. If the backup is stored elsewhere, select A Backup Stored On Another Location, and click Next. Depending on the location of the backup, click Local Drives or Remote Shared Folder, and click Next. If you specified Remote Shared Folder, you will need to type in the UNC name for the backup in the form of \\servername\sharename. On the backup location screen, verify your backup set, and click Next. Select the server data you want to recover, and click Next.
On the Select Backup Date screen, select the date and possible time for the backup set you want to recover from, and click Next. On the Select Recovery Type screen, select System State to recover the system state information, and click Next. Select the area you would like to recover your system state data to, either the original location or an alternate location. If you are trying to recover, make your selection, and click Next. On the Summary screen, review your selections, and then click Recover.
After the recovery process is complete, review the results, and click Close. Recover System State Data Containing Active Directory Data. If your system state backup contains Active Directory information, you will not be able to recover the data via the recovery wizard unless you specify an alternate location to recover to.
If you try to recover the data in the Windows Server Backup tool, you will see an error message similar to the one shown in Figure 8. Figure 8. 1. 7: System state with Active Directory data error. To perform a system state recovery of your Windows Server 2. R2 server containing Active Directory information, you need to boot the operating system into Directory Services Restore Mode (DSRM). Specifically, you will be performing an authoritative restore. Before you can boot into DSRM, you need to configure your boot process: Click Start, type msconfig, and click the Msconfig program under Programs.
Click the Boot tab. In the Boot Options section, select the Safe Boot check box, and select the Active Directory Repair option. Your screen should look like Figure 8.
Figure 8. 1. 8: Booting into DSRMRestart the server. Openstreetmap Garmin Etrex Vista Hcx Bike. Log on to the server with the local administrator ID and the DSRM password you created while installing the server. Start Windows Server Backup by selecting Start .
If the backup is stored locally on an internal hard drive, verify that This Server is selected, click Next, and proceed to step 1. If the backup is stored elsewhere, select A Backup Stored On Another Location, and click Next. Depending on the location of the backup, click Local Drives or Remote Shared Folder, and click Next. If you specified Remote Shared Folder, you will need to type in the UNC name for the backup in the form of \\servername\sharename. On the Specify Backup Location screen, verify your backup set, and click Next. Select the server's data you want to recover, and click Next. On the Select Backup Date screen, select the date and possible time for the backup set you want to recover from, and click Next.
On the Select Recovery Type screen, select System State to recover the system state information, and click Next. Select Original Location, and select Perform An Authoritative Restore Of Active Directory files, as shown in Figure 8. Figure 8. 1. 9: Authoritative restore.
You will receive a warning noting that all replicated content on the server will be resynchronized and that this can cause potential latency on your server and network. Acknowledge the message by clicking OK. On the Summary screen, review your selections, and then click Recover. You will receive another warning message stating that system state recovery cannot be paused or canceled once it has started. Click Yes to proceed with the recovery, or click No to complete the recovery at a later time.